lunes, 23 de febrero de 2015

Maya Python/PyQt Alignment Plugin Rewritten and Extended

Unfortunately, a few days ago my computer decided to crash forcing me to reinstall the OS. I thought i had all my code files and stuff safe in the Data drive... well I proved to trust wrong because guess where the system got installed with the recovery partition? yes !! in my data drive!!. What pisses me off mostly is that i ve lost all the five programming assignments from the Coursera MOOC "Algorithms, part I", which i ve previously talked about in this blog. Other code I had was some python/pygame computational geometry stuff i did in my spare time.

And finally, my first Maya plugin also was lost. So far from being discouraged, i decided to recode again the plugin adding the feature someone suggested me in the spanish TD facebook group and also i decided to extend the plugin in order to be able to do 3 types of operations with the object's pivot.

Before i post the youtube video showing how it works i will talk a bit about some tips i didn't post previously that i had forgot and that i had to face again.

Qt Designer

I used Qt Designer to visually establish the layout of my window. Two things about this:

- first, i wanted to use two sets of exclusive radioButtons which led me to set two separate QButtonGroups. With the left button on each QButtonGroup i selected the radiobuttons to be members of it.

- Secondly. I wanted to put QGroupBoxes because it is a feature that enhances the visual look of the window as well as helping figure out visually which parameters are part of the same option. For this you have to firstly select the groupbox and drop it in the window layout, and after and only after, put inside the necessary widgets. You will notice if you have done it correctly because the widgets appear to be "parented" to the groupbox in the "Object Inspector" 

This is how it looks like:


UI xml file conversion to python file

The .ui file saved by Qt Designer is no more than an xml file that has to be converted to .py file with all the window layout so that we can instance it in our window class from our Python/PyQt main file.

For this we open the windows command line, we set the path to our .ui file and type:

pyuic4 align.ui > align.py


Our Maya Plugin

We declare our class that this time inherits from QWidget and add the WindowStayOnTopHint.

class AlignWindow(QtGui.QWidget):
    def __init__(self, parent=None):

        QtGui.QWidget.__init__(self, parent, QtCore.Qt.WindowStaysOnTopHint)
        self.ui = Ui_Alignment()
        self.ui.setupUi(self)


Since Maya is running its own QApplication thread this code causes Maya to stall:

if __name__ == "__main__":
    app = QtGui.QApplication(sys.argv)
    mw = AlignWindow()
    mw.show()
    sys.exit(app.exec_())

But instead can make the window visible when running from Visual Studio. To make it work in Maya it suffices to write:

myWindow = AlignWindow()
myWindow.show()


Three different Pivot Alignment Techniques

- pivot in object(s). Aligns the pivot(s) within the bounding box(es) of each of the object(s). That was what my first plugin, yes the one i lost did.

- pivot(s) to object's pivot. Aligns a set of object(s) pivot(s) to the last selected object's pivot.

- object(s) to object. Aligns a set of object(s)'s pivot(s) to the last object selected but this time so that we translate the objects maintaining their relative position regarding their pivots.


miércoles, 28 de enero de 2015

NURBS Loft Tool Utility


This is a little problem i found when modeling my product shot for the demo reel.
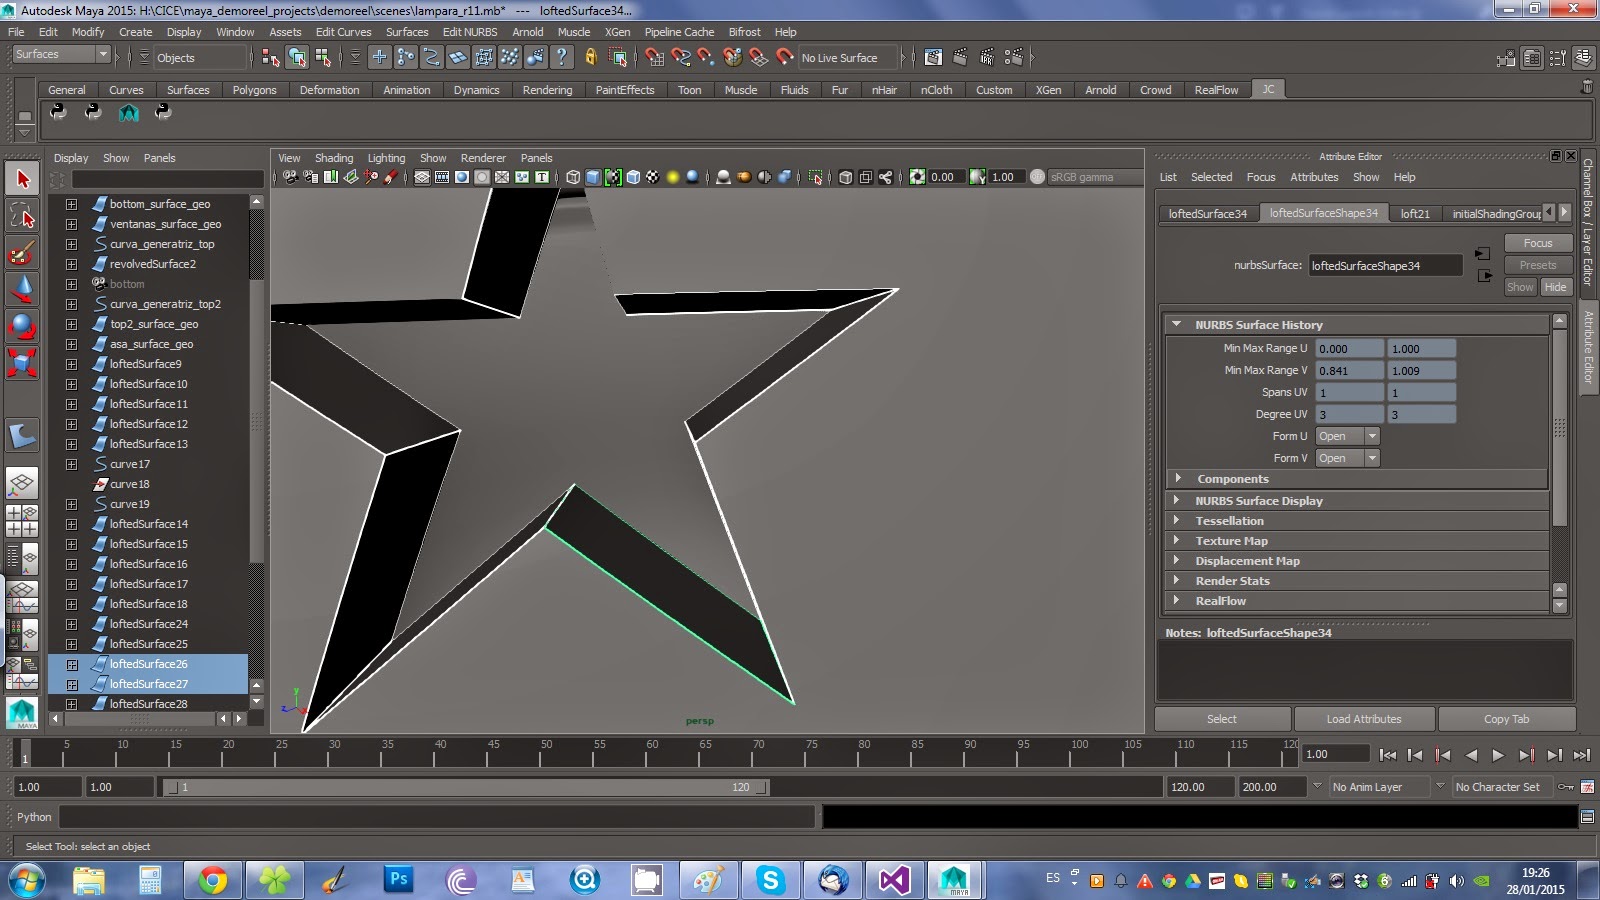
After using the "trim tool" for doing that star shape hole on the geometry i needed to do a loft between the onward and backward star edges.
This is what i got from the "loft tool":


As you can see if you zoom in the image a problema arises : the resulting "geometry" is very ugly. At first i thought it could be the viewport cheating. I did a render and... exactly, the lofted surfaces were as shown :( --> big problem.

So I decided to automate the first process i came into when i started this, which was selecting pair by pair of trimmed edges and loft them. The drawback was that I had to do several times the op. Here comes Python I thought. It took me a couple of minutes and a look at http://download.autodesk.com/us/maya/2011help/CommandsPython/loft.html to figure it out.

import maya.cmds as mc

curSel = mc.ls(long=True, selection=True)
if not curSel :
    sys.stdout.write("No object(s) selected!!")
else:
    nOfEdges = len(curSel)
    for i in range(0,nOfEdges,2):
        mc.loft(curSel[i],curSel[i+1])

Important Note: it's crucial for the code to be effective that you SELET BY PAIRS
of trimmed edges that might be lofted, because the current selection respects that order.


Here above all the trim edges selected.
Now below the result after applying the script:


Notice how the topology is now super clean!!! :))

martes, 20 de enero de 2015

Computational Geometry: 2D Convex Hull


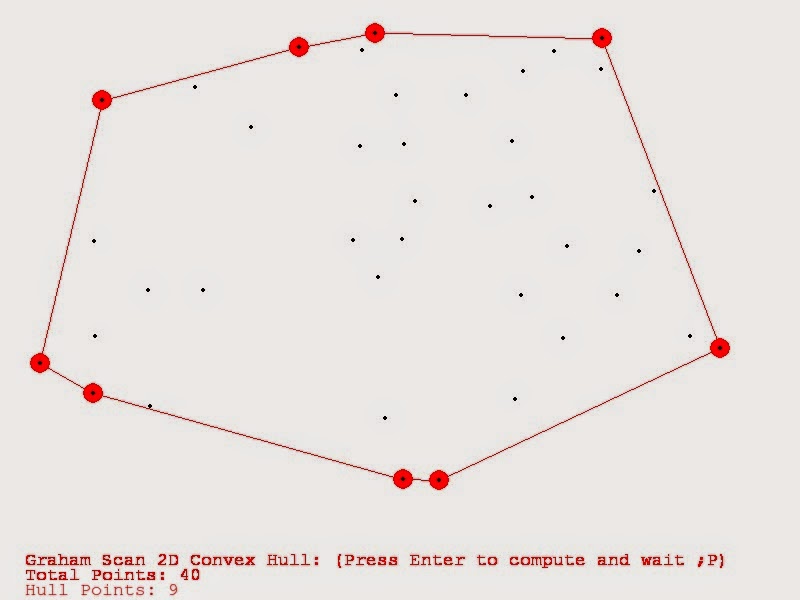
In computational geometry, of the many problems computer scientists have dealt with is to find the hull of a set of points. There are several approaches for this but the "Graham Scan" algorithm guarantees a performance in time of O(nlog(n)) which  is optimal.

This algorithm makes use of sorting methods such as merge sort because it respects the previous order in subsequent sortings.

Finding the convex hull has many applications in 3d digital content creation tools as well as in image processing and so many other fields.

Since I finished the MOOC on algorithms I wanted to code this algorithm. Nevertheless, the web is full of code for this. In my case, I've followed the approximation held in Algorithms, 4th Edition by Sedgewick. Pseudocode can be found here.

I've had a good time coding this :D!
Here are some results from the video.


sábado, 3 de enero de 2015

Another Drawing!!


This time I rescued an old drawing of the days when I was son keen on Nine Inch Nails. The character is Trent Reznor and he is portrayed in the dark ages between his Downward Spiral (1995) album and The Fragile (1999) when he was after known for suffering depression, social anxiety disorder and bear with the grief of his grandmother's death. His grandmother raised him alone. Also he got addicted to cocaine and suffered from alcohol addiction as well as other thoughts about committing suicide, he was walking on the thin line. One day he was reborn when he used chinese white heroin which he believed was cocaine and consequently overdosed, he ultimately resuscitated at a local hospital.

Trent Reznor has a bipolar disorder which he exorcitates through his music. One can notice the strength and high tempo of some of his tracks combined immediately after with other calmer, softer parts, probably reflecting his ambivalent manic-depressive disorder. I can't help being moved by this kind of people, people with mental illnesses which bear constantly with their condition and in spite of it , no matter what they manage to get through. Obviously not all of them succeed, many commit suicide. There is another public character with bipolar disorder that I look up to after learning all he has had to suffer and that is Stephen Fry the english comedian, actor, writer, and so, so many other things. Stephen Fry deserves an entry on his own.

The drawing is just a quick sketch with some postproduction with Photoshop: colour adjustment and rain effect.

I'll leave you with my favourity NIN song, a cover of one of Joy Division's tracks Dead Souls, part of the The Crow Soundtrack.


miércoles, 31 de diciembre de 2014

Morning of pencil and paper!!

Some friend of mine critized me because my blog is called "Art & Tech" and so far there has been a lot of "Tech" and practically no "Art". And I think she's right, (God save me from disagreeing with a woman!!)

I tend to load the Tech truck more because it's interesting for me but also because I believe it's harder to master, or at least the logical part of your brain is not as involved in Art as it is in this. Those of you who know me get the idea that I don't pretend to belittle Arts. In fact I find it indispensable for my life, it's just that there are moments and moments for each and since i come from a technical background I tend to lie more often there. But I'm aware that I need to boost my art skills so here I
am!!

This morning of 31st December is a wonderful morning for drawing a little bit. I already have around 10 hours of english study with Bai & By, going in 1-2 hours of study per day rhythm I think it's ok if I'm able to sustain it through the rest of the course.

The other "homework" i had was to search for references for my models in order to do my demo reel. As of now, I'm pretty well with the results and ideas i have, though it's true I could do some more just to cover my back.

Ladies and gentlemen with great honour I present you: Anna Nicole Smith!! God bless her, life wasn't easy for her.


domingo, 28 de diciembre de 2014

Learning Maya: first polygon modeling exercise

Enough of computer science for a while here, i will be posting a modeling exercise we did in class before christmas.

I've been practising to gain speed but each time I repeated the exercise I bumped into new problems, I guess that's part of the higher learning. My teacher is quite convinced this is good, moreover he deals with the exercises in class in such a way that we will find "unexpected" problems.

From my point of view I think it's cool because it enriches the class. The easy way to go for him would be to do things straightforward but then little we would learn!

3D requires a constant practising effort because one always runs into problems we need to solve to get the job done and often there are several ways to do the same thing but not all of them are quick and when you find yourself in a rush it's fairly good to know the best way.

The exercise consists of a hard surface using Maya polygon modeling tools. It's the first and the last we have done of its genre because we needed to begin with animation and so the modeling classes were interrupted.

It's a hamster wheel done in approximately 1 h 30 min. This includes importing the image plane references and adjusting sizes to make sure the images match from the three cameras. I had a little trouble with some unexpected behaviour when converting NURBS surface to polygon when doing the "feet" that sustain the wheel. Hopefully I will get faster with practice.

Here is the image reference:


And here is the turntable i did with playblast.


By the way, I'm gathering ideas aimed at my demo reel. I have some things in mind but i need to check up on them with my teacher, as I suspect there might be any not suitable at all.

domingo, 7 de diciembre de 2014

Learning Python: Objects, Bindings And Names

As you all know, i'm currently following a course on Maya in order to become CG Generalist one day (hopefully on April/May 2015 i will land a job in the games/film industry).

Having a programming background i can't help myself learning Python to complement my skills in Maya and so, i started a couple of weeks ago to mess around with the Maya Python Command Engine and PyQt for GUIs.

Well, this last friday i received Maya Python for Games and Film which has revealed to be quite instructive. The first chapters telling the basics, one can still learn something new specially if you come from another more traditional language such as C/C++ like me.

Each time we learn a new programming language we try to find the same mechanics we found on the ones we already know as well as the new features, those that sustain the raison d'être of this new language.

Well, taking the first steps in Python that's what happened to me: as i am used to in C++ i try to figure out whether a variable in Python is a reference (&), a copy( new object) or a pointer (*).

The truth is this way of thinking does not fit well into Python. In Python one cannot think any more about "variables" but rather "names" and references and pointers become "bindings". It will make you do less errors and get less unwanted surprises when coding. I've found the following example in the web:

1
2
3
4
5
6
7
8
9
>>> dict = {'a':1,'b':2}
>>> list = dict.values()
>>> list
[1, 2]
>>> dict['a']=3
>>> list
[1, 2]
>>> dict
{'a': 3, 'b': 2}

If you store the result of dict.values(), and change the dictionary afterwards, the previously stored result remains untouched. However, if a dictionary has lists as value entries, the behavior is not the same: If you change the dict, the list you previously created via dict.values() gets automagically updated.

1
2
3
4
5
6
7
8
9
>>> dict = {'a':[1],'b':[2]}
>>> list = dict.values()
>>> list
[[1], [2]]
>>> dict['a'].append(3)
>>> dict
{'a': [1, 3], 'b': [2]}
>>> list
[[1, 3], [2]]

One would think that the same method dict.values() has different behaviour depending on the values of the dictionary. In the first case it would return a copy of the values in a list and in the second case it would return a reference/pointer. Well dismiss references, pointers and variables and think of names, bindings and objects.

EXPLANATION

I find the graphical answer explaining this on the web by Michael Hudson very illustrative and self-explanatory so i will "echo" it here in my blog just as a reminder.

Case 1. "Copy"
1
>>> dict = {'a':1,'b':2}

The above line could be illustrated as follows:

    ,------.       +-------+
    | dict |------>|+-----+|     +---+
    `------'       || "a" |+---->| 1 |
                   |+-----+|     +---+
                   |+-----+|     +---+
                   || "b" |+---->| 2 |
                   |+-----+|     +---+
                   +-------+

where "dict" is a name, all the others surrounded by +---+ are objects and ------> are bindings.

>>> list = dict.values()

    ,------.       +-------+
    | dict |------>|+-----+|             +---+
    `------'       || "a" |+------------>| 1 |
                   |+-----+|             +---+
                   |+-----+|              /\
                   || "b" |+-----.    ,---'
                   |+-----+|     |    |
                   +-------+     `----+----.
                                      |    |
    ,------.       +-----+            |    \/
    | list |------>| [0]-+------------'   +---+
    `------'       | [1]-+--------------->| 2 |
                   +-----+                +---+
Now,  this:

>>> dict['a']=3

    ,------.       +-------+
    | dict |------>|+-----+|             +---+
    `------'       || "a" |+-.           | 1 |
                   |+-----+| |           +---+
                   |+-----+| |            /\
                   || "b" |+-+---.    ,---'
                   |+-----+| |   |    |
                   +-------+ |   `----+----.
                             |        |    |
    ,------.       +-----+   |        |    \/
    | list |------>| [0]-+---+--------'   +---+
    `------'       | [1]-+---+----------->| 2 |
                   +-----+   |            +---+
                             |            +---+
                             `----------->| 3 |
                                          +---+

So list and dict yield the no surprise result:

>>> list
> [1, 2]
> >>> dict
> {'a': 3, 'b': 2}

which is fine.

Case 2. "Reference"


>>> dict = {'a':[1],'b':[2]}
    ,------.       +-------+
    | dict |------>|+-----+|     +-----+   +---+
    `------'       || "a" |+---->| [0]-+-->| 1 |
                   |+-----+|     +-----+   +---+
                   |+-----+|     +-----+   +---+
                   || "b" |+---->| [0]-+-->| 2 |
                   |+-----+|     +-----+   +---+
                   +-------+

>>> list = dict.values()
    ,------.       +-------+
    | dict |------>|+-----+|             +-----+   +---+
    `------'       || "a" |+------------>| [0]-+-->| 1 |
                   |+-----+|             +-----+   +---+
                   |+-----+|               /\
                   || "b" |+-----.    ,----'
                   |+-----+|     |    |
                   +-------+     `----+-----.
                                      |     |
    ,------.       +-----+            |     \/
    | list |------>| [0]-+------------'   +-----+   +---+
    `------'       | [1]-+--------------->| [0]-+-->| 2 |
                   +-----+                +-----+   +---+


>>> dict['a'].append(3)

                                                    +---+
    ,------.       +-------+                     ,->| 1 |
    | dict |------>|+-----+|             +-----+ |  +---+
    `------'       || "a" |+------------>| [0]-+-'
                   |+-----+|             | [1]-+-.
                   |+-----+|             +-----+ |  +---+
                   || "b" |+-----.         /\    `->| 3 |
                   |+-----+|     |    ,----'        +---+
                   +-------+     |    |
                                 `----+-----.
    ,------.       +-----+            |     \/
    | list |------>| [0]-+------------'   +-----+   +---+
    `------'       | [1]-+--------------->| [0]-+-->| 2 |
                   +-----+                +-----+   +---+

Since the list binded by the object "a" is the same binded by the first position object of "list" the above statement is changing the same "referenced" object. So we have the following correct either:


> >>> dict
> {'a': [1, 3], 'b': [2]}
> >>> list
> [[1, 3], [2]]

CONCLUSION

In a nutshell i think that python tries to avoid copying objects whenever possible and it has a reason because copying is always expensive, not to mention deep copying!! So whenever we need a copy of an object we have to explicitly request it via copy.copy().