miércoles, 23 de diciembre de 2015

Python Idiosyncrasies (I)

I want to post here some Python language characteristics i find different and interesting for anyone coming from more traditional ones such as C. So far i've used them every once and a while in the time i've been coding tools here in Madrid and i intend to do several related posts in the future as i learn new features.

I have to say that this only relates to Python 2.7 which is the version Mayapy 2015 comes with.

Composite conditions

Here we find the two key words: "any" and "all"

Both can receive as input a list of expressions that return a boolean and in turn the result is a boolean

"any" equivalent: "if sentence1 or sentence2 or sentence3.... or sentenceN"

"all" equivalent: "if sentence1 and sentence2 and sentence3... and sentenceN"

This way those complex expressions in the conditional can be reduced in combination with a list comprehension. For example this snippet of code shows how to check if some letters appear in a string:


1:  if any(letter in "somestring" for letter in ['a','b','c','s']):  


would return True whereas:


1:  if all(letter in "somestring" for letter in ['a','b','c','s'])  


would return False. 


Iterating multiple lists (I)

Use here the zip() command as stated here:


1:  for elementA, elementB in zip(listA,listB):  


It is worth noting that the zip command iterates until the last element of the shortest of the lists. Though many times both lists have same length, it might not always be the case. Furthermore, you might encounter the need to iterate until the longest list, returning a predefined value for empty element. There is another command for this from the itertools module:


1:  import itertools  
2:  list1 = ['a1','b1']  
3:  list2 = ['a2','b2','c2']  
4:  for element1, elemen2 in itertools.izip_longest(list1,list2)   


By default empty indices' value are set to 'None'.

What happpens if you want this behaviour but also be able to use the element's index?

There is the "enumerate" command that returns a list's current index and element.


1:  for index,element in enumerate(list1):  


And even more: we can combine iterating through multiple lists with the index of the element. In this case we will have one index and two variables holding each current element like so:


 for same_index, elementA, elementB in enumerate(zip(listA,listB)):  


 Iterating multiple lists (II)

What we have seen previously is okay, but there is a better way to do the same things in terms of execution time and memory consumption and it relies again on the itertools module.

Using a context manager i have measured the execution time of both functions hereby:


 def slow():  
          for i, (x,y) in enumerate(zip(range(10000000),range(10000000))):  
              pass  
 def quick():  
          for i, x,y in itertools.izip(itertools.count(), range(10000000),range(10000000)):  
              pass  
 measure(slow)  
 measure(quick)  


 Slow() function took 3.32 seconds whereas quick() took 1.30!! A good reason to take into account the itertools module.

Joining strings

Difference between os.path.join() and str.join() both are similar in behaviour.

os.path.join('path','to','directory')

takes a variable number of string arguments to assemble them all into a string with os.sep (operating system path separator). Note that it won't put an os.sep character at the beginning of the string neither at the end. But, if it's an absolute path you can always set as first argument the os.sep character.

if you have the arguments in a list instead of comma separated you can expand the list into it using the * operator thus this would also work:

os.path.join(*['path','to','directory'] 


 Now the str.join method does take a tuple or list as argument and the 'str' string or character will be the separator thus this:

'-'.join(['a','b','c'])

yields the following string : 'a-b-c'. Note again that there is no '-' at the beginining nor at the end.   

domingo, 13 de diciembre de 2015

Driving A Vector's Direction By Euler With Maya Node Editor

Introduction

Past thursday one my fellow mates at the office in charge of refining the shots and animating dynamics asked me to help him with a problem he was facing: he needed to map the euler rotation angles from a CTRL transform to the nucleus' gravity direction vector. In short: control with angles the direction of a vector.

He was trying with the "angleBetween" node looking for some way to solve his problem. I have to say that at first he wouldnt explain  to me correctly what he needed but that's because he was striving for it himself.

The next day, this is last friday, while at the bus in the morning to the office i remembered the conversation he had a couple of days earlier asking for this to my fellow riggers. They seemed to fill the expectations of my comrade in need with their answers. It wasnt clear for me but i was too busy with something else and didnt want to intercede.... Until now, where this was something that was puzzling him for quite a few days now.

So i started to suppose what was the problem and started to think how i would solve it with nodes.

Controlling Vectors through Rotation

In fact, once aware of the problem the solution is just applying some simple math. We have a curve/CTRL's transform that represents rotations with Euler angles.

Well, we need to apply the rotation of the control to the vector. In terms of maths, we need to get the matrix representation of the rotation. Maya's node editor has a ComposeMatrix node that generates a matrix with information on translation, rotation, scale, shear depending on what the input is.

Next step is to multiply this matrix by the vector we want to transform. Again, Maya has VectorProduct node for this that can do different operations such as Dot, Cross, VectorMatrix and PointMatrix.

v' = M * v

All that is left is just attach the output of the operation to the nucleus's gravity vector....and voilà!!!

Voilà????? Hold on a second, there is a little problem.

One little problem

The way i approached for the first time the node network i was convinced it had to work from the beginning since these are simple maths. But i was committing one error that stems from the fact that i was a little unaware of how nodes work.

I was using the current gravity vector direction to feed the operation and then the result attached back to the nucleus as input..... And i tried to test with known trigonometric values and i was getting a strange behaviour: the numbers just didn't correspond to a valid result.

My network suffered from a "cycle" that never stopped: i'm feeding the input of the attribute with the output of the same attribute after doing some calculation....

But i found one workaround for this.


Workaround

After trying inefficiently to break that cycle using an intermediate transform where i would store the result and pass it on again to nucleus i decided to write a post in a Maya forum convinced of the fact that this can be made without using a transform or any other supplemental entities.

But i kept thinking after the post, enbraved by the fact that i wasnt getting a quick question and i was stuck. Well, if all i need is the starting value of the nucleus how about putting that same initial value into a transform and use it instead of the nucleus to feed the calculation? That way  i can attach directly the result to the nucleus gravity vector. All i have to make sure is that both vector values: nucleus initial value and transform's value are the same!! It doesnt matter really which channels of the transfrom i use provided they represent the three vector componentes X, Y,Z. I decided to use the translate.


Additional Comments

It's worth noting that since the initial value of the vector is such that the module is 1.0, the results after the matrix multiplication must be also of module 1.0. Since a rotation matrix doesnt change the module of a vector. 

This was helpful to rapidly notice wrong numbers and therefore there was a problem. Also, testing with cosine and sine values of most known angles such as 0,30,45,60,90 degrees.... One is used to see numbers like 0.707 or 0.5 and 0.866 etc....

Also, note that because we are using the rotation the translation of the control/curve doesnt matter.

viernes, 20 de noviembre de 2015

Overriding Python str class setter.. How?

Coding another tool in python as usual i was getting tired of printing several debug messages. The script performs some calls to multiple main methods that in turn call other secondary  methods. I wanted to track the final status of each call so i thought that it would be a good idea to print a message each time a "msg" object changes its value. Thus recurring to the 'set value triggers function call' paradigm.

One solution i found was to create a new class that inherits from "object" and use @property and @<member>.setter with an intermediate string object to store the text.

But i wasn't satisfied enough and coming from C++ i was wondering if it was possible to inherit directly from "str" class and just override its setter.

Since i found no info on the web, i resorted to write to a tech forum. 

Here is my post:


I'm coding a script that performs different complex tasks and i want to output status messages regarding the execution of the script.
Rather than doing a "print" statement after each main function call i 've thought it would be nicer to have a string object that automatically prints something each time the variable's value changes.
So this lead me to write a custom class with a variable and a setter to it like the following:

Code:
class Msg(object):
    def __init__(self):
        self._s = None
    
    @property
    def status(self):
        return self._s
    @status.setter
    def status(self, value):
        self._s = value
        call_custom_function()
Now the question: I've come to the above solution but i'm wondering if it's possible to inherit directly from str class and just override the setter... thus not needing an intermediate variable like _s and be able to do something like
Code:
msg = Msg()
msg = "hello"
instead of the current:
Code:
msg = Msg()
msg.status = "hello"
I've searched the web and i haven't found how the str class works besides the fact that it's a "sequencer" type just like a list...

The same day i received several answers that despite interesting were missing the point of my question, until i got finally the explanation.

Here is the final reply that enlighted me:
Code:
msg = Msg()
msg = "hello"
to anyone who write python code, these lines mean this:

1. Create an instance of the class Msg and assign it to msg
2. msg is now the string "hello"

Your instance of the Msg class has been overwritten. Thats why it makes no sense. Why create an isntance of a class just to over-write it with a string.

Ahhhh this is what i was getting wrong!!! In a language like C++ one can overload the "=" operator and hence the second line would call the overloaded method from the "=" operator from the msg instance of Msg() Class. The type of "msg" doesnt change!!!!

But in Python we dont have such behaviour, so when we assign "hello" we are just changing the type of the variable to be a string!! 


sábado, 14 de noviembre de 2015

How To Get Rid of PyQt Widgets Correctly

Introduction. The Tool.


In recent weeks i was told it would be nice to have some kind of reference editor outside Maya. Something simple that allowed animators to chose which references they wanted to load in the scene and which ones they didn't want.

What are the advantages for this requirement? The main reason is although we have at the studio powerful workstations in terms of Ram, CPU and Graphics processor some assets like set, props etc are really big, one single prop can take 3 GB!! and depending on the scene you can have almost 400 references. If each prop took that much space.. you can do the math.. it's simply unmanageable. It's not that huge in reality but it remains a big problem also if you take into account the amount of time it takes to load them all and finally open the scene. An animator would normally only want to load the character he/she is about to work with leaving aside all the props and set elements that don't interact with the character. This enables everyone to work faster.

Obviously the external reference editor must be "non-destructive". What i mean for this is it should not delete the reference node in Maya. Why? Obviously this external reference editor is useful for opening a scene file for the first time. Once the scene is loaded in Maya the animator must use the Maya reference editor to load/unload assets. In this case, to load all the necessary assets once the animation is finished, so that everything is in place when the playblast is published. So we need to let the animator the chance to load in Maya the rest of the assets and for this, he needs the reference node of the asset to be present in the scene.

After analyzing the Maya ASCII scene file it was clear what changes to do to the file to unload a specific asset.

Design. The problem.

Here is what i thought it would be a good design: i would use a dynamic list of widgets where each line would be composed of a QCheckBox showing the current state of the reference and the reference node of the asset.

I used the same approach as other times when i needed to code a dynamic list of widgets which consisted mainly in two steps:

A) we have a widget that triggers the fullfillment of the dynamic list. It can be something like a QComboBox to select the file's work area.

B) each time the dynamic list is filled we need to create a "line widget" with its proper layout which contains the QCheckbox and the QLineEdit. Those widgets are created each time which also means they need to be properly deleted, otherwise we will run into memory problems. And that was the origin of the bug i had.

When i first coded a dynamic list like this and wasn't that much versed into python i googled to look for the proper way to delete a widget, and i found this site in stackoverflow to be very useful although somewhat confusing. So many ways to apparently delete QWidgets!!

Digging into the proper solution.


There were three methods that apparently reached the same result:

1) the close() method in the QWidget class
2) the setParent() to None method also in the QWidget class also
3) the deleteLater() also in the QWidget class

I always thought the setParent() to None in each parent widget worked well. So in the method before filling the list i called a cleanup_scrollArea() method which was coded like this:

for i in reversed(range(layout.count())): 
        layout.itemAt(i).widget().setParent(None)
Relying on the fact that in the documentation they say: "the new widget is deleted when its parent is deleted".

I wont explain much. Only tell that this apparently works. Setting the the parent of a widget to None breaks the connection of the PyQt tree and causes all the children to not show anymore.

But there was a big bug. Whenever i tried repeatidly to test the tool with different files the tool crashed within the third or fourth iteration. The dynamic list's behaviour was apparently correct and working well, everything looked alright and i had no error message to give a hint of the problem.

I had the suspicion it had to do with a problem in the deletion of the widgets because the memory increased in each iteration even if the file had less refereneces to show than the previous one!. And obviously it was crashing when you tried to repeatidly use it. It must be a problem in the dynamic list!!

The Solution.

It  took me a short but intense moment  to figure out what was happening. And here my experience with a language such as C/C++ that deals with memory management helped me a lot since PyQt is a bind for Nokia's Qt written in C++.

What was happening?

Setting the  widget's parent to None only breaks the connection in the Qt widgets tree and causes the python reference to be deleted by the garbage collector. But what about the C++ QWidget Object that python was referencing? C++ does not have a garbage collector, so the C++ object's memory has to be deleted manually.

Here is why we have to use deleteLater() 's QWidget method. That's what it does, it frees the memory the C++ object is using..That's what we were missing! Furthermore deleting the C++ object makes the python references invalid therefore we don't need to set anymore to None the parent's widget,

The cleanup_scrollArea() method became:

while aLayout.count() > 0:

    item = aLayout.takeAt(0)
    widget = item.widget()
    if not widget:
        continue

    widget.deleteLater()

Design Improvement Quick Note

Creating and deleting widgets is expensive. It's a very stressful task even for a language like C++ with it's new and delete methods. So it may look like this behaviour for a dynamic list is not the best fit.

In the PyQt documentation they say that for this it may be better to use a QStackedWidget and play with the show() / hide() methods of the widgets which i believe reserves memory for a set of widgets and in the next iteration it reuses the same widgets changing their properties, hiding and adding new widgets on demand as needed. Might want to try this sometime!


jueves, 17 de septiembre de 2015

Nested References in Maya

I've found myself in the need at work to be able to get all the references a shot had. What you can get with file(q = True, r = True) are only the top level references leaving behind the nested ones.


I've read somewhere that is a good practice trying to avoid such levels of depth, but in this case we were in a closet.

So after a while searching the web and the official Maya python documentation i hit with referenceQuery and the "children" flag.

Finally i developed this simple method that fills a python list with reference filenames:


    def add_nested_references(self,parent_ref_list):
       
        for parent_ref in parent_ref_list:
            child_list = mc.referenceQuery(parent_ref, f = True, ch = True)
            if child_list != None:
                   self.add_nested_references(child_list)
                   parent_ref_list.extend(child_list)


martes, 8 de septiembre de 2015

How to Recover Linux Grub Boot Loader

Normally, the order of installation should be first windows then linux so that the grub boot loader is installed and recognizes the windows partition too.

At my job i had to do it the other way around: we had a system with Centos 7 linux and we needed to install Windows to make this machine we useful either to rigging either to production staff.

I inserted the windows dvd and made a new partition in the unallocated space then install.

When i restarted the machine the linux boot loader had disappeared so i was googling how to recover it. Truth is it's pretty simple and after a really few minor mistakes i managed to make it work:

We need first to enter in RESCUE mode with a linux installation dvd/cd.

The system will be most probably mounted in /mnt/sysimage so we make the

chroot /mnt/sysimage

after that we do:

/sbin/grub2-install /dev/sda

to make grub recognize our windows entry just type:

sudo grub2-mkconfig > /dev/null

If everything went well the windows loader entry has been detected, all we need now is to save it to the grub.cfg:

grub2-mkconfig -o /boot/grub2/grub.cfg

Restart and voilà, we have our boot loader back with our windows O.S. entry!!!

domingo, 2 de agosto de 2015

Advanced Multithreading GUI Programming with PySide

One of the tasks i was in charge of was to look for a video player in linux that met several requirements from the art director. Some of them were:

- available for linux
- free
- frame by frame backwards and forward playing
- hotkeys for the above, not only buttons
- able to play several clips in a row
- no blank frame between clips
- able to play the audio of the video as well
- autoloop feature
- plays .mov, .mp4, .avi, compatible with the most possible codecs out there.

The autodesk RV Player is the best one according to some experienced animators but we couldn't afford licenceses for each individual.

After testing the obvious ones such as VLC (with jump in time extension), Openshot, MPlayer (with SMPlayer front-end)... All of them were lacking any of the listed features. Concretely i couldnt restrain my disappointment when i found that VLC's extension wasnt working as claimed on the web.

Several days passed by, and in the meantime i was busy doing other stuff and the animators had to deal with openshot which is not properly a video player but rather a video editor.

Anyways i found out that openshot was built upon the media lovin't toolkit video engine (MELT from now on)

So i decided to install it and give it a go.

Couldn't compile the last version 0.9.6 so i tried the 0.9.2 and yeah it worked!!

I was testing it and realized it met all the primary requisites only drawback: it had to be launched from the terminal and this was not as much user-friendly as it should for an animator.

So i was talking to my boss and he suggested coding a gui for maya that listed all the videos in the work directory and launch the player through Maya. That's when i got "hands on".

CODING THE TOOL

I was getting pretty advanced with the gui programming in PySide/Python time to do a test and launch the player came.

And here i discovered a big problem for me that took me some time to resolve. The problem was that the video player was correctly launched if done manually from an opened terminal but when done from the python script with:

import subprocess

command = ["gnome-terminal", "-x", "bash", "-c", "/usr/bin/melt <videofilefortest>"]
subprocess.call(command, shell = False, env = os.environ.copy())

it was giving an error regarding one of the dynamic link libraries (the famous "DLL" files in windows).

TWO WAYS TO SOLVE IT

Further investigation revealed that doing "ldconfig" in that terminal and launching again the player was a solution. "ldconfig" apparently rebuilds a cache file that specifies the name and path of each dynamic library so the system is able to find them. That opened a way to go. I just had to be able to login as root in the script, do a "ldconfig" and then launch MELT.

Another logical way was to mimic the same environment configuration between the two terminals setting and unsetting the ENV variables until both matched. It was clear that both terminals had different configuration. A "printenv > env_good.txt" and "printenv > env_bad.txt" helped to list the ENV variables of both terminals.

SOLUTION

I was jumping from one strategy to the other always testing. Had some difficulties trying to login as root in a script and also i wasn't confortable hardcoding the root password for obvious security reasons.

Finally i noticed that some important ENV variables werent set in the "good terminal" such as PYTHONHOME PYTHONPATH etc. So I decided to UNSET them prior to launching the player. With some help from a linux forum a user suggested also to UNSET not only those variables but also PATH, LD_LIBRARY_PATH. I agreed and finally it worked!!

EXPLANATION

Apparently, the way subprocess.call works is it executes the commands in a child process. Child processes inherit by default the environment from the parent process which in this case is Maya. But Maya itself is launched with specific configuration that doesnt necessarily match the default one.

It was the LD_LIBRARY_PATH what made it work. Makes sense since the concrete problem was the system wasnt finding where the libraries were.


ADVANCED GUI PROGRAMMING

That problem solved the rest was straightforward.

I noticed that the "search-the-filesystem-for-videos" was taking a bit too much time causing the tool to be apparently "frozen". So I decided to add something showing the tool was busy while searching. Something like a "living" waiting pattern.

This obviously led to the use of multithreading: one showing the waiting state while the other performs the search.

First i was wrong because i tried to run in a background process the GUI waiting icon. And i was wrong because a simple search in google showed that all the GUI processing has to be done in the main thread, and not in secondary ones. That is a good thing to know. I just had to switch the tasks and.. voilá.

I was really proud of it, not that it mattered too much since it was more like an aesthetic thing but i have to admit i haven't done much multithreading programming in all my years of programming.

domingo, 19 de julio de 2015

Selection Button In Maya MEL

It's been a while since my last post. The reason is that work's keeping me really busy and i'm learning a lot about Python and MEL. 

The last couple of weeks i 've left temporarily rigging the props and i 've got back to scripting.

It happens that some of the main characters' rigs cannot use FK because the dynamics don't work, so i was talking to one of the lead animators and he came up with an idea, and i was the one to code it and make it possible. I did several scripts that accomplish all the tasks the lead animator asked for the main and secondary characters. Still it has to be tested by the art director and the other lead animators but it feels like it's really useful since it mimics an FK chain with IK controls.

One of the scripts is a panel with selection buttons. Those buttons select each locator so they can animate the locators and then bake the animation.

In MEL we have the "select -r <whatever>" which selects the new by replacing the old. Also we have "select -tgl <whatever>" which adds the selected to the current selection.

The MEL code for a button is:

button -label $label -command $command

Where $command stands for some sort of  "select" as described before. The problem is none of them 
works as it should. I wanted to "select -r" replace but with the ability to Shift Select other locators, this is to add them to the selection if i use Shift just like Maya works.

The solution is to add the following line of code to the $command:

So that finally the button code results like this:

string $command = "string $object=\"object_name_to_select\"; int $mods = `getModifiers`; if (($mods)%2 == 1) select -add $object; else select $object;";

button -label $label -command $command

I'd like to post some rigs i've done but i'm afraid i cannot show the models due to confidentiality terms. 

jueves, 28 de mayo de 2015

Shortcut in Linux

How to create a shortcut in linux that executes a shell script

1. We create the shortcut.


Typically it's a ".desktop" ascii file with these entries although it can have more:

[Desktop Entry]
Type=Application
Encoding=UTF-8
Name=Sample Application Name
Comment=A sample application
Exec=application
Icon=application.png
Terminal=false

- The Name specifies the name of the launcher.
- Exec is the most important line as it specifies which script to launch and how it would be launched. We will leave this field blank til we have the shell script written
- Icon we set the path of the app's icon if available.
- Terminal specifies whether the app needs a terminal to run.

2. We create the shell script.


#!/bin/bash
. ~/.bashrc
PATH=$PATH:/srv/XXXX/XXXX/final_directory;
export PATH
cd /srv/projects/myproject
[some commands executing applications]

The first line is a comment indicating which shell will execute the script, in this case BASH.

The second line is a line that loads all the basrc file extensions

Then we perform some tasks such as adding another value to the system environment variable path and export that new entry.

We change our current directory and finally we call some commands that will launch our application.

3. We link the Exec command of the desktop file to the script


Note: if we have successfully coded our script it should work from the command line writing:

sh <ourscriptname>.sh

In our case an example of launching the shell script from our desktop file by double-clicking is

Exec=gnome-terminal -x bash -c "sh /path/to/thescript/scriptname.sh;bash"

Another linux tip: when we try to open a file sometimes we dont get to choose the right program even selecting "open with other programs". The trick to making appear the application in that list is editing as root its corresponding ".desktop" file normally placed in /usr/shared/applications/<name>.desktop and in the "command" or "Exec" field write at the end of the command the following: "<previous_commands><blank space>%U"

We save... and that should do the trick!!!

sábado, 23 de mayo de 2015

Job as Rigger/Pipeline TD

After a few frenetic weeks rushing to meet the deadline imposed by the CG Student Awards 2015 (13 May) finally i had something to show. And I say finally because for the last months i've applied for jobs where i was aware i needed at least a demo reel, so instead i used to tell my life in neverending emails hoping to get caught by some samaritan producer.

Well this last week was in the end very productive. I had no more than 3 job opportunities:

- The first one was an internship of a month and a half in Lightbox Entertainment thanks to a master colleague that already works there. You never know how important networking is.

- The second one was an internship at a company in Barcelona but the work could presumably be done from here from Madrid. They told me they really liked my work and that they would put me as rigger in spite of the fact that they were looking for a 3d modeler. They revealed to be very kind: i sure would have loved working for them. The company name is PaperFrog and they are currently making a TV3 show regarding animals and dinosaurs.

- The third one, the one i chose, is at a company in the center of Madrid. They are starting the production of a new feature film but they don't have made many claims regarding this yet. The film is intended to deliver next year and i have a contract for almost the rest of the year. I cannot talk really much about it because of the confidential terms but in the press note they released in April they say Spa Studios has done the character development and that the script has been written by the guy that worked in Madagascar 2 and others. It looks really promising.

I leave you here with the show reel i presented to the CG Student Awards. I very doubt that i win anything but the purpose for me was to do some work and have something to show when applying for a job.

domingo, 19 de abril de 2015

UV Texturing: A Problem and A Solution

These days there's been a lack of entries in my blog mainly cuz i'm spending my time developing my demo reel and mainly cuz i want to meet the final deadline of the CG Student Awards 2015.

My intention is to present a short cut of say 2 or 3 seconds but caring about all aspects of CG and after, show the breakdown of everything. It will be a pirate shooting a ship cannon, there will be particles, characters, hard surface modeling, compositing and.... texturing!

Yes the problem i faced i want to talk about now is making the uv's of my cannon. I mean, i could just have done automatic uv's with mudbox but i wanted to follow the same process as in videogames and what the hell , i wanted to learn how to make proper UVs!

For this, i had my cannon finished and i exported the base mesh without smoothing/subdividing it to an OBJ file in order to be imported in UVLAYOUT 2.06. The UVs are always made in the low base mesh resolution.

Well, i started working in the uvs, it was a lot of work since i handmade all the uvs of even the tiny nails. And when i got to the point where i wanted to export my model with the uvs if found what i thought was a big problem: Headus UVLayout 2.06 exported all in a single mesh, despite the fact that it can read and load an obj with groups of meshes.

So what a problem i thought, since i wanted to be able to maintain the groups of meshes to work easily when texture painting and giving highest resolutions to different parts of the cannon. I really though at first i had wasted a lot of time.

The first thing to clarify was if the problem was effectively from the Headus UVlayout 2.06 tool. Navigating through the forums of UVLayout i found exactly that from version 2.07 up until the current they added the functionality to export an obj with several groups of meshes!!. Well from now on i will work with Headus  UVLayout 2.08 if i can.

Now the problem was still there: how to transfer the uvs from the obj with single mesh to a multimesh object with no uvs.

The answer again was in the internet. In Maya there is a tool called "Transfer Attributes" which can do just that: it transfers the properties of a mesh to another, i was still a bit skeptical since one obj file was all packed in a single mesh and my Maya cannon original low res file was grouped into different meshes, so not quite sure it would work.

I opened my Maya file with the low res grouped into meshes ship cannon and i imported the obj file with the UVs. Selected both, did "Transfer Attributes" Options, checked "UV" and applied..... And it Worked!!

Now I have at last, my model separated and grouped in different meshes all with the same UVs i had worked!!!. Now I can proceed to Mudbox and start painting!!!

lunes, 23 de febrero de 2015

Maya Python/PyQt Alignment Plugin Rewritten and Extended

Unfortunately, a few days ago my computer decided to crash forcing me to reinstall the OS. I thought i had all my code files and stuff safe in the Data drive... well I proved to trust wrong because guess where the system got installed with the recovery partition? yes !! in my data drive!!. What pisses me off mostly is that i ve lost all the five programming assignments from the Coursera MOOC "Algorithms, part I", which i ve previously talked about in this blog. Other code I had was some python/pygame computational geometry stuff i did in my spare time.

And finally, my first Maya plugin also was lost. So far from being discouraged, i decided to recode again the plugin adding the feature someone suggested me in the spanish TD facebook group and also i decided to extend the plugin in order to be able to do 3 types of operations with the object's pivot.

Before i post the youtube video showing how it works i will talk a bit about some tips i didn't post previously that i had forgot and that i had to face again.

Qt Designer

I used Qt Designer to visually establish the layout of my window. Two things about this:

- first, i wanted to use two sets of exclusive radioButtons which led me to set two separate QButtonGroups. With the left button on each QButtonGroup i selected the radiobuttons to be members of it.

- Secondly. I wanted to put QGroupBoxes because it is a feature that enhances the visual look of the window as well as helping figure out visually which parameters are part of the same option. For this you have to firstly select the groupbox and drop it in the window layout, and after and only after, put inside the necessary widgets. You will notice if you have done it correctly because the widgets appear to be "parented" to the groupbox in the "Object Inspector" 

This is how it looks like:


UI xml file conversion to python file

The .ui file saved by Qt Designer is no more than an xml file that has to be converted to .py file with all the window layout so that we can instance it in our window class from our Python/PyQt main file.

For this we open the windows command line, we set the path to our .ui file and type:

pyuic4 align.ui > align.py


Our Maya Plugin

We declare our class that this time inherits from QWidget and add the WindowStayOnTopHint.

class AlignWindow(QtGui.QWidget):
    def __init__(self, parent=None):

        QtGui.QWidget.__init__(self, parent, QtCore.Qt.WindowStaysOnTopHint)
        self.ui = Ui_Alignment()
        self.ui.setupUi(self)


Since Maya is running its own QApplication thread this code causes Maya to stall:

if __name__ == "__main__":
    app = QtGui.QApplication(sys.argv)
    mw = AlignWindow()
    mw.show()
    sys.exit(app.exec_())

But instead can make the window visible when running from Visual Studio. To make it work in Maya it suffices to write:

myWindow = AlignWindow()
myWindow.show()


Three different Pivot Alignment Techniques

- pivot in object(s). Aligns the pivot(s) within the bounding box(es) of each of the object(s). That was what my first plugin, yes the one i lost did.

- pivot(s) to object's pivot. Aligns a set of object(s) pivot(s) to the last selected object's pivot.

- object(s) to object. Aligns a set of object(s)'s pivot(s) to the last object selected but this time so that we translate the objects maintaining their relative position regarding their pivots.


miércoles, 28 de enero de 2015

NURBS Loft Tool Utility


This is a little problem i found when modeling my product shot for the demo reel.
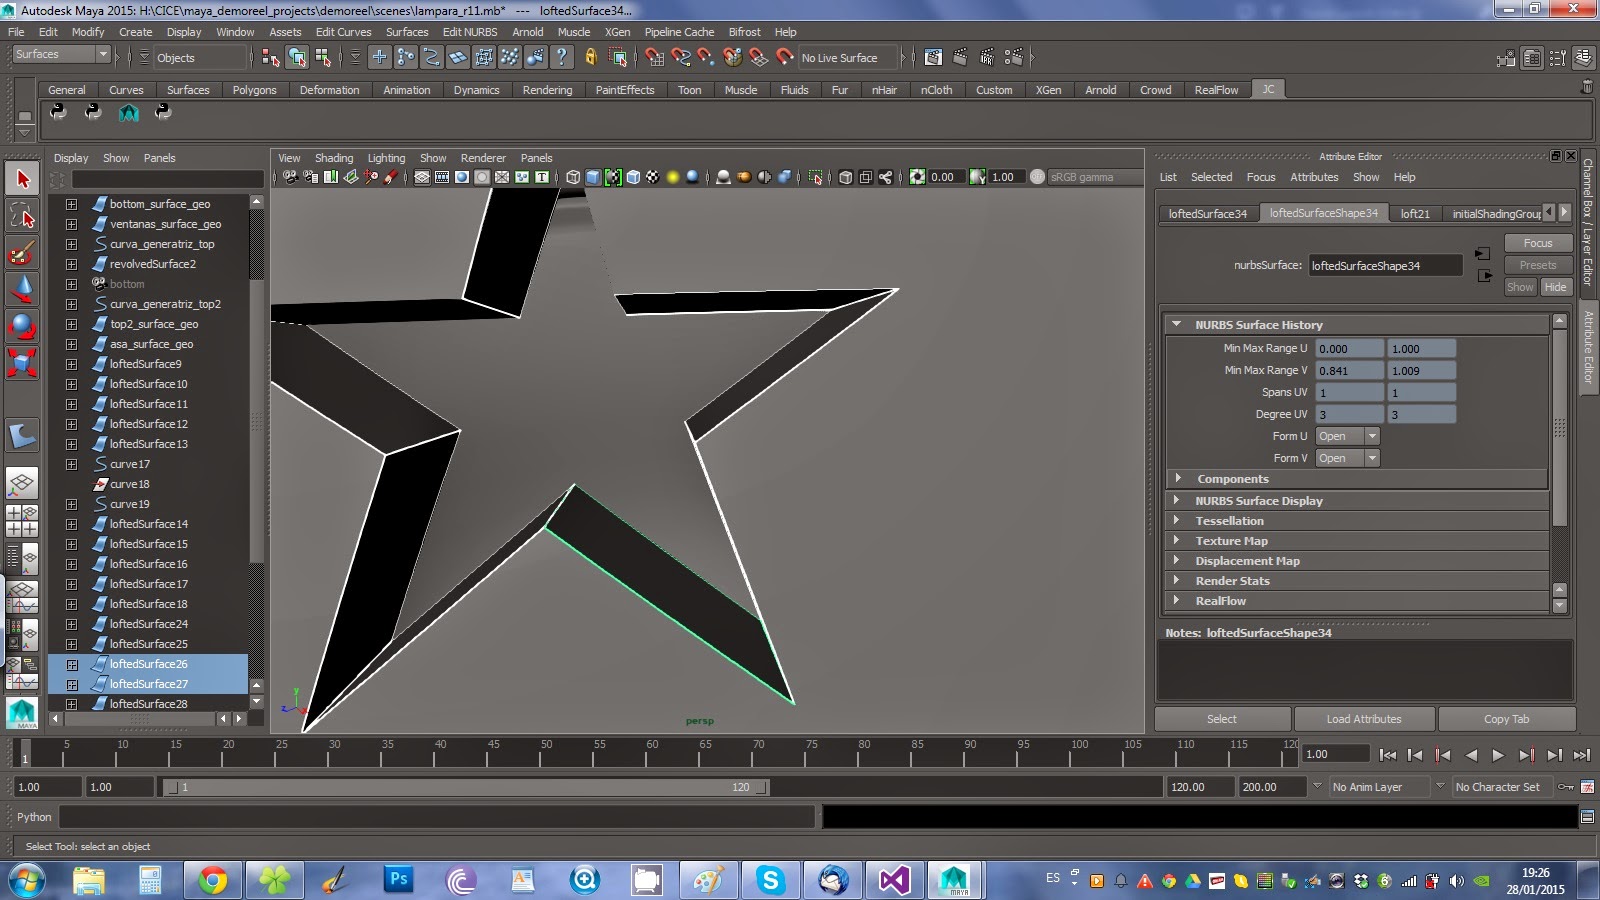
After using the "trim tool" for doing that star shape hole on the geometry i needed to do a loft between the onward and backward star edges.
This is what i got from the "loft tool":


As you can see if you zoom in the image a problema arises : the resulting "geometry" is very ugly. At first i thought it could be the viewport cheating. I did a render and... exactly, the lofted surfaces were as shown :( --> big problem.

So I decided to automate the first process i came into when i started this, which was selecting pair by pair of trimmed edges and loft them. The drawback was that I had to do several times the op. Here comes Python I thought. It took me a couple of minutes and a look at http://download.autodesk.com/us/maya/2011help/CommandsPython/loft.html to figure it out.

import maya.cmds as mc

curSel = mc.ls(long=True, selection=True)
if not curSel :
    sys.stdout.write("No object(s) selected!!")
else:
    nOfEdges = len(curSel)
    for i in range(0,nOfEdges,2):
        mc.loft(curSel[i],curSel[i+1])

Important Note: it's crucial for the code to be effective that you SELET BY PAIRS
of trimmed edges that might be lofted, because the current selection respects that order.


Here above all the trim edges selected.
Now below the result after applying the script:


Notice how the topology is now super clean!!! :))

martes, 20 de enero de 2015

Computational Geometry: 2D Convex Hull


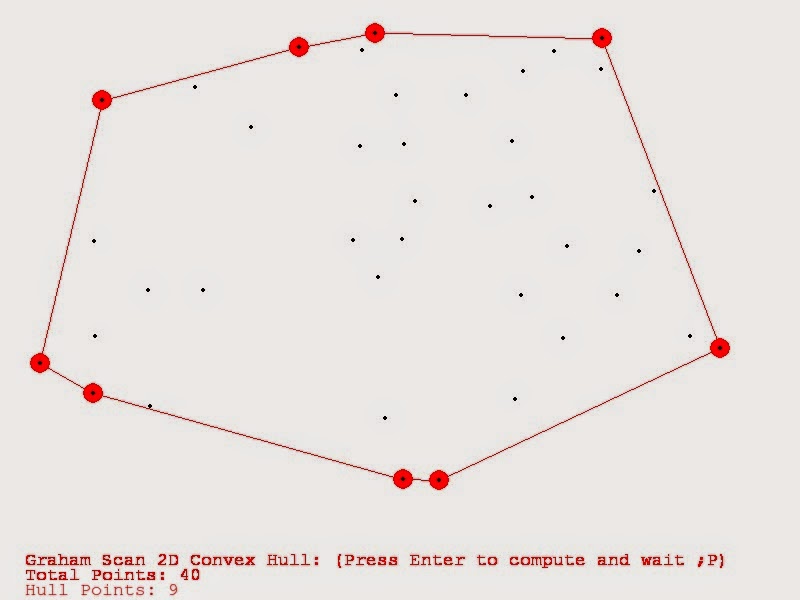
In computational geometry, of the many problems computer scientists have dealt with is to find the hull of a set of points. There are several approaches for this but the "Graham Scan" algorithm guarantees a performance in time of O(nlog(n)) which  is optimal.

This algorithm makes use of sorting methods such as merge sort because it respects the previous order in subsequent sortings.

Finding the convex hull has many applications in 3d digital content creation tools as well as in image processing and so many other fields.

Since I finished the MOOC on algorithms I wanted to code this algorithm. Nevertheless, the web is full of code for this. In my case, I've followed the approximation held in Algorithms, 4th Edition by Sedgewick. Pseudocode can be found here.

I've had a good time coding this :D!
Here are some results from the video.


sábado, 3 de enero de 2015

Another Drawing!!


This time I rescued an old drawing of the days when I was son keen on Nine Inch Nails. The character is Trent Reznor and he is portrayed in the dark ages between his Downward Spiral (1995) album and The Fragile (1999) when he was after known for suffering depression, social anxiety disorder and bear with the grief of his grandmother's death. His grandmother raised him alone. Also he got addicted to cocaine and suffered from alcohol addiction as well as other thoughts about committing suicide, he was walking on the thin line. One day he was reborn when he used chinese white heroin which he believed was cocaine and consequently overdosed, he ultimately resuscitated at a local hospital.

Trent Reznor has a bipolar disorder which he exorcitates through his music. One can notice the strength and high tempo of some of his tracks combined immediately after with other calmer, softer parts, probably reflecting his ambivalent manic-depressive disorder. I can't help being moved by this kind of people, people with mental illnesses which bear constantly with their condition and in spite of it , no matter what they manage to get through. Obviously not all of them succeed, many commit suicide. There is another public character with bipolar disorder that I look up to after learning all he has had to suffer and that is Stephen Fry the english comedian, actor, writer, and so, so many other things. Stephen Fry deserves an entry on his own.

The drawing is just a quick sketch with some postproduction with Photoshop: colour adjustment and rain effect.

I'll leave you with my favourity NIN song, a cover of one of Joy Division's tracks Dead Souls, part of the The Crow Soundtrack.